Line-by-line coding in NVivo 10 and 11
In this post, I explain how to do line-by-line coding in Nvivo 11 and how to overcome the limitations of NVivo 10 to apply this coding technique.
Briefly on line-by-line coding
Line-by-line coding refers to applying codes to each line of qualitative data (e.g. interview transcript). I find this technique extremely useful when I really want to “dig deep” into my data and extract as much as possible from it. It is commonly associated with constructivist grounded theory (Charmaz, K. 2014 – Constructing Grounded Theory. London: SAGE.), because it is particularly useful when we don’t want to impose a pre-existing framework onto our data, but rather to let new themes emerge from it, which constructivist grounded theory researchers mostly do. If you are investigating a “new”, or under-researched, phenomenon, such approach may enable you to effectively discover its various components, while also controlling your own assumptions about it, as the initial, detailed codes you are creating are, essentially, a summary of what was said in a given line of text. I will post a separate entry about line-by-line coding elsewhere, and for now I will assume that since you want to know how to apply this kind of coding in Nvivo, you have already made an informed decision as to why this approach suits you.
Line-by-line coding in Nvivo 11
At the time when I was involved in my study of Polish migrants’ English Language Identity, I was working with NVivo 10, which was much less adjusted to line-by-line coding than Nvivo 11 currently is.
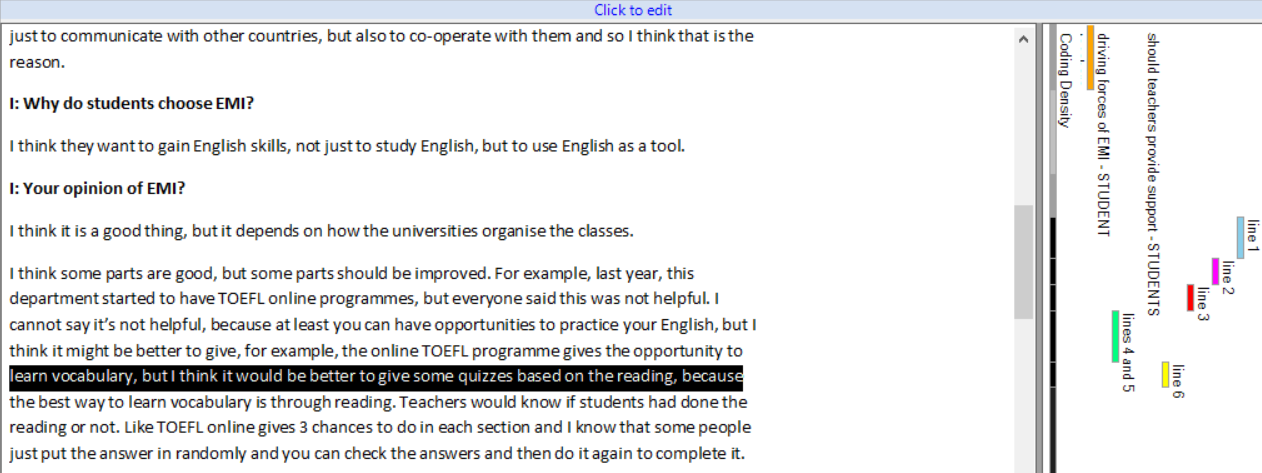
In both versions of the software, after you code each line of the text, then go to VIEW > CODING STRIPES, the box on the right-hand side will show you the “stripes” indicating the codes (or, in Nvivo’s tems, nodes) that you used. The improvement that Nvivo 11 introduced is that the stripes clearly indicate the length of the coded text. Therefore, as you can see in Figure 1 below, it is possible to easily distinguish between the codes, and attribute these codes to the text, even if each line is labelled with another code.
Figure 1

Although this is a major improvement from the previous version, which was much more “clumsy” in this respect, it is my personal opinion that it is still not as practical as it should be. Once you created a big number of codes, constantly having to look at these numerous, vertically aligned and colourful, codes may be very exhausting.
If you are working on NVivo 10, or have Nvivo 11 but are not satisfied with how the codes are shown, read the following section on what else can be done to make line-by-line coding appear in a more “traditional” way (i.e. with codes being shown horizontally next to each line).
Line-by-line coding in Nvivo 10
Unfortunately, doing line-by-line coding in Nvivo 10 is not possible without having to “go around” its limitations. Although you can, of course, code any given line, word, or piece of text you want, the problem is that when you do line-by-line coding, you ideally want it to show next to the next you coded in a clear way, so that you can easily inspect the data (particularly because there may be so many codes in the text – I created 190 codes from my first 5 interviews in my study of English Language Identity!). The coding stripes in NVivo 10, however, do not correspond to the length of the coded text on the left hand side. Figure 2 shows coding strips for an interview extract with each of its lines coded.
Figure 2

You can clearly see in the above figure the problem with line-by-line coding in Nvivo 10 is. So what can be done about it? The following is a way around this limitation. It is time consuming, but it’s worth it if you really want to apply this kind of coding in Nvivo 10. Also, remember that you usually do line-by-line coding just for the first few sources (e.g. interviews), until the point when there is no need to create new codes, as the newly inputted data could be fully covered with the existing codes. In my case, this point occurred after 5 interviews. After that, you will start to minimize the number of your codes, to put them into categories and synthesise them into more inclusive and broader themes.
To do line-by-line coding in Nvivo 10, I first used Microsoft Word. I created a table with 2 columns, and pasted the interview transcript into the left-hand side column. Then, as I was reading the text, I put the newly created line-by-line codes in the right-hand side column, next to the text to which the code referred. Of course, the “codes” are not really that in Microsoft Word. They are merely your notes on how you will later code this next, once you import the document into Nvivo. You can see what this looked like in the following figure.
Figure 3

You can see that although it is not perfect, and the “codes” are sometimes “pushed” a little bit too far down, or up, by the other codes, it does make it possible to indicate what happens in each line, and it is often recommended that line-by-line coding is used to do just that – to summarize what is happening in each line of the text.
In the next step, I imported the file to Nvivo just like I would normally do with another interview transcript. This is where the boring part starts, because now, using your right-hand side “codes” as a guidelines, you have to select and properly code each line in Nvivo, replicating the Microsoft Word “codes” you previously created (Nvivo will not automatically recognise your Microsoft Word codes as codes, for NVivo they are just part of the text you imported).
From now on, the line-by-line codes in the right column of the table will only serve as a reminder of which codes were used in a given line, due to, as noted above, NVivo not showing these codes next to the text (see Figure 2). Figure 4 shows the whole process I described above.
Figure 4

As I said, it is time-consuming but this process only needs to be adopted for only a few of the first sources. Later, when certain patterns begin to emerge from your inspection of line-by-line codes, and you start to merge the codes into more general categories, there is no need to apply line-by-line coding, and the decreasing number of codes means that it is no more a problem to organise your data in NVivo. Of course the Microsoft Word “codes” will become useless once you begin to merge the codes, but for a start I believe they allow for a detailed and efficient analysis to be carried out.